
Connecting ERPNext to Unicommerce
Unicommerce Settings is the single page that holds both your account connection and every synchronisation option. This step covers establishing the connection; later steps configure what is synced.
Open Unicommerce Settings
- In ERPNext, search for Unicommerce Settings in the search bar.
- Open the record. It is a single settings page that always exists, so you configure it rather than create it.
Enter your credentials
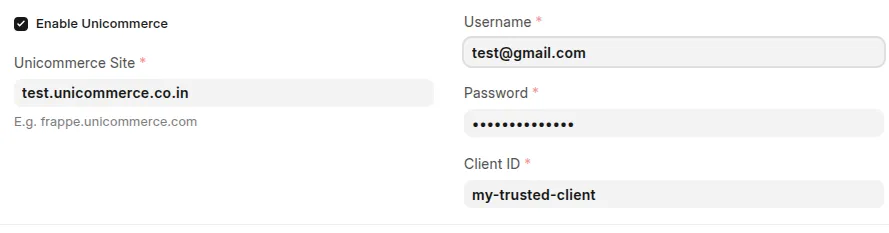
In the Authentication Details section, complete the following fields:
| Field | What to enter |
|---|---|
| Unicommerce Site | Your tenant host, for example demostaging.unicommerce.com. |
| Client ID | The API client identifier, for example my-trusted-client. |
| Username | Your Uniware integration username. |
| Password | Your Uniware integration password. |
Then tick Enable Unicommerce and Save.
What happens when you save
On save, ERPNext requests a token from Unicommerce using the password grant:
POST https://<your-site>/oauth/token
    grant_type = password
    client_id  = <your client id>
    username   = <your username>
    password   = <your password>
The response is stored back on the settings page:
| Field | Meaning |
|---|---|
| Access Token | The bearer token sent with every API request. |
| Refresh Token | Used to obtain a new access token without resending your password. |
| Expires On | The moment the current access token stops being accepted. |
Why the host format matters: the site must be a bare host such as
acme.unicommerce.co.in. A value that includeshttps://or a trailing slash produces a malformed token URL, and authentication will fail.
If authentication fails on save
Work through these in order:
- Confirm Unicommerce Site has no
https://and no trailing slash. - Confirm the Client ID matches the one issued for your tenant.
- Confirm the username and password by signing in to Uniware directly.
- Confirm the integration user is active and not locked.
Walkthrough
Last updated 3 weeks ago
Was this helpful?